Network load balancing is a service that comes with Windows 2000 Advanced Server (not plain old Windows 2000). In this article we will set up Network Load Balancing on a cluster of two systems and test via the telnet service.
The Network Load Balancing service is unlike other popular load balancing schemes like Red Hat Advanced Server (Piranha) or Big-IP, because it doesn’t have a single server that routes the requests. Rather, all interfaces in the cluster listen on the same address and discard packets that don’t belong to them. So, when a host tries to connect to port 80 at the cluster address, all hosts in the cluster will receive the request, but only one host will respond. This has the potential of scaling beautifully. True, the switch could get kind of swamped, but a switch is a lot better at handling tons of traffic than an OS is. The drawback is that the load balancing is pretty dumb. On Big-IP, for instance, you can maintain persistence with cookies. Persistence is when the load balancer keeps sending requests from a particular host to a single server in the pool. If you are filling up a shopping cart, you don’t want to get shuffled off to a different server during different stages of your purchase. The Network Load Balancing service does offer some options for affinity (a way to keep persistence). Namely, you can set up NLB to assign the same host ip/port to the same server (of course), assign the same host ip with different ports to the same server, or assign all hosts within a class c to the same server. This brings up some problems. Since HTTP will make multiple connections from different ports with the same IP address, you have to set the affinity to at least stick requests from the same IP address to the same server. Now, if the host uses a proxy server that changes the IP address with each request, or if there are a bunch of hosts that use port address translation so they all appear to come from the same address, this scheme either won’t work at all, or won’t load balance correctly. In the case of Big-IP, cookies can track the host and assign it to the correct server. A few copies of Windows 2000 Advanced Server, though, are much less expensive than a Big-IP solution, if you can live with the other limitations.
The hosts in the cluster transmit heartbeats to eachother and remove bad hosts from the cluster if they don’t hear from them, so you also get limited failover capabilities. For more information about Network Load Balancing, check out this introduction by Microsoft. OK. Enough discussion. Let’s get started on the install!
We got a copy of Windows 2000 Advanced Server from Microsft for 15 bucks here. If you are considering a deployment of Network Load Balancing, you should certainly test it with the eval before you decide to purchase Advanced Server. Note that you need Advanced Server for each host in the cluster. Click on each of the links below for the associated screen shots of our install:
Here is a screenshot of the Windows 2000 Advanced Server install starting
The only extra component we will add is Terminal Services
Choose Application server mode
We’ll use Windows 2000 permissions
We only checked Network Load Balancing and TCP/IP in the Networking Components dialog
We’ll call the workgroup SWIMMING
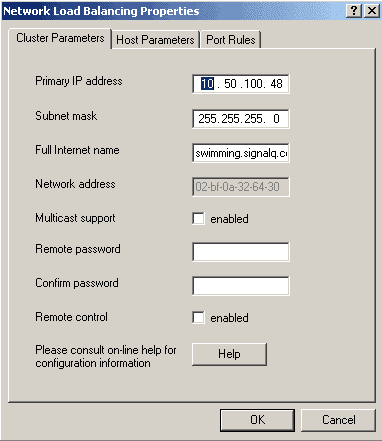
Now, let’s configure the cluster itself. On the properties for the LAN connection, select the Network Load Balancing properties. We have two hosts: 10.50.100.46 and 10.50.100.47. Our cluster will be at 10.50.100.48. The cluster parameters on both hosts are:
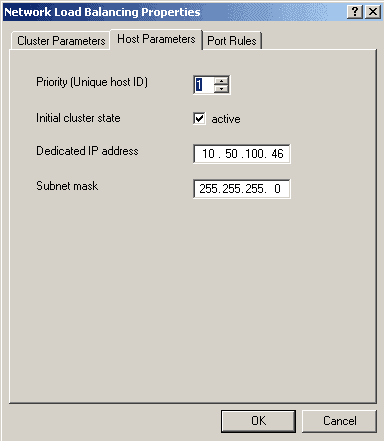
The host parameters on the .46 host are:
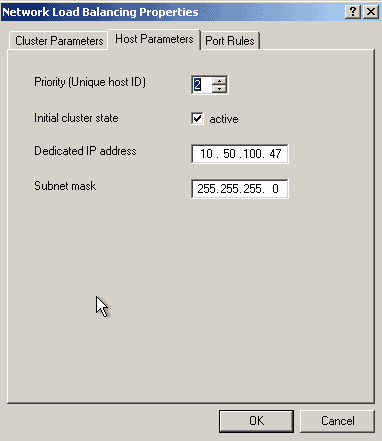
The host parameters on the .47 host are:
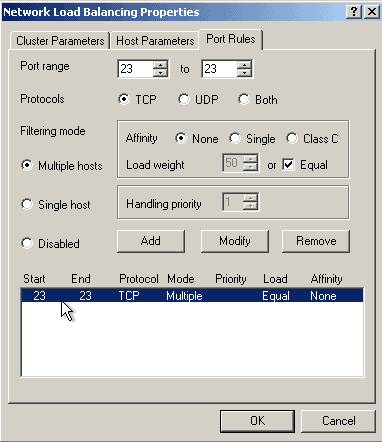
We plan to test the load balancing with telnet. For more information on the telnet service included with Windows 2000, see this article. For this test, we only need to load balance port 23. We don’t need any affinity, since telnet only uses a single connection per session. When setting the port rules, highlight the rule at the bottom, and click modify. Change settings in the GUI, and hit modify again when done. Note that this is not like most GUI configuration interfaces, since it appears that you can merely click on the settings and click OK. It makes more sense when you realize that you can have multiple load balancing rules:
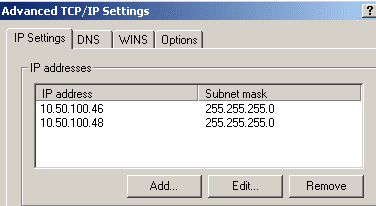
The primary address is the cluster address. The dedicated address is the unique host address. In the advanced properties of the .46 host, we put the dedicated address in first, and then the cluster address:
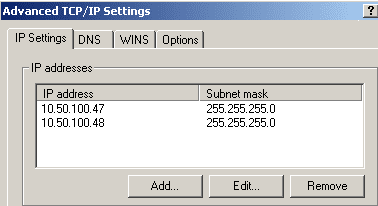
Likewise for the .47 host:
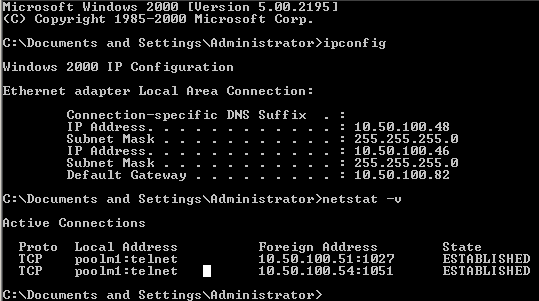
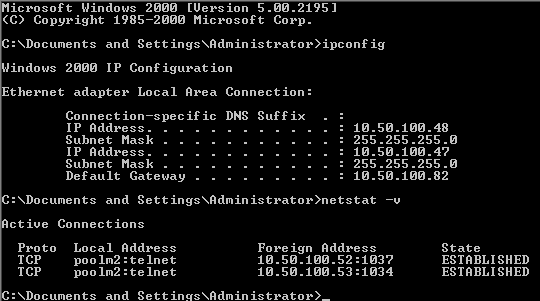
Let’s telnet to 10.50.100.48 from four different machines in our lab (click here for a screenshot), and run netstat -v on the two hosts in the cluster:
Now, one annoying thing about the telnet service that comes with Windows 2000 is that it only allows two connections. That is why we only made four connections total in the above example. Network load balancing is a statistical process. That is, it randomly selects a host to use. It is possible that the first three connections try to go to one host. If that happens, then just try again to fill up both connection limits on both hosts in the pool. In this article we will start up more connections by combining Network Load Balancing with terminal services.

