What would you say if I told you that you could bring up a system that provided LAMP with two files:
[usr-1@srv-1 Desktop]$ ls -l total 127720 -rw-rw-r-- 1 usr-1 usr-1 88861055 Jul 2 03:37 stage3-i686-2004.3.tar.bz2 -rw-rw-r-- 1 usr-1 usr-1 41779457 Jul 2 02:51 xampp-linux-1.4.14.tar.gz [usr-1@srv-1 Desktop]$ |
I’m talking bare metal here. Do I have your attention? Let me explain. There is a truly amazing project called XAMPP that provides MySQL, PHP, Perl, and Apache services. In addition, there are management tools that let you easily monitor and secure your new LAMP system. LAMP, for those of you in a cave, is Linux, Apache, MySQL, and Perl/PHP. If you are scrappy and on a budget, this is a good platform to look at. It is widely used and there are many tools available for free. For details about the XAMPP project, see the homepage here. Now, the installation of XAMPP is pretty much a one-liner. What was *interesting* to us was to determine if the claims of few dependencies were true. Additionally, we see this project as an awesome recovery tool. Further, this project truly does remove you from the dependency on a particular vendor for your GNU/Linux system. In this article we will use a stage 3 tarball from the Gentoo project, install lilo, make the system bootable, and see if the claims are true. If you have followed NetAdminTools for long, you know that we often bring up systems with *some* filesystem and a kernel, coupled with Lilo. The nice thing about starting with a stage 3 Gentoo filesystem is that it can easily be morphed into a broader system.
Let’s get started. We are using a VMWare system to bring this up. We created a new IDE device, and booted a GIAGD system we created in this article. We need to mount the new hard disk and extract the stage 3 tarball from Gentoo. Note that you can get the stage 3 tarball for many different architectures. We used the 2004.3 version. Go to:
http://www.gentoo.org/main/en/mirrors.xml
For our purposes, we then browsed to this file:
releases/x86/2004.3/stages/i686/stage3-i686-2004.3.tar.bz2
Notice we are starting with an empty filesystem:
[root@(none) /]# df Filesystem Size Used Available Use% Mounted on /dev/hda1 886.5M 178.5M 662.9M 21% / /dev/hdb1 846.8M 20.0k 803.7M 0% /newsys |
Let’s copy the files over and extract. We will use the existing kernel from boot. We will use lilo as the bootloader:
[root@(none) /]# cp -r /neededfiles/* /newsys/ [root@(none) /]# cd newsys [root@(none) newsys]# ls lilo-22.6.1.src.tar.gz lost+found/ newboot/ lilo.conf stage3-i686-2004.3.tar.bz2 [root@(none) newsys]# [root@(none) newsys]# tar -xjvf stage3* |
There will be some errors about ownership of the dev devices, but that is fine. We are currently booted off of the hda device. We need to add another entry for the new system on hdb in lilo.conf:
boot = /dev/hda prompt # always expect prompt timeout = 150 # wait 15 seconds vga = normal # force sane state lba32 # 'linear' is deprecated delay = 30 # delay 3 seconds if there is a stored command line #serial = 0,1200n8 # uncomment to use COM1 too read-only # initailly mount roots r/o default=linux-giagd image = /boot/vmlinuz label = linux-giagd root=/dev/hda1 image = /boot/vmlinuz label = linux-genfs root=/dev/hdb1 |
Now, run lilo:
[root@(none) etc]# lilo Added linux-giagd * Added linux-genfs [root@(none) etc]# |
Our existing system will need /boot eventually. Boot has our kernel:
ot@(none) newsys]# rm -rf boot [root@(none) newsys]# mv newboot boot [root@(none) newsys]# |
We need to set the password for the new system:
[root@(none) ~]# chroot /newsys [root@(none) /]# passwd New UNIX password: Retype new UNIX password: passwd: password updated successfully [root@(none) /]# |
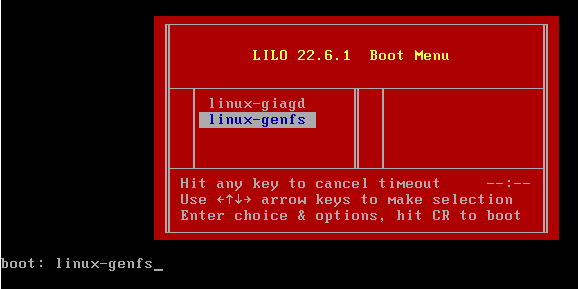
We also need to follow the instructions in this article to set up the network and start sshd by default by editing /etc/conf.d/net, running rc-update add net.eth0 default and rc-update add sshd default. We can then reboot and choose linux-genfs:
Let’s log on to our new system and install lilo:
[usr-1@srv-1 ~]$ ssh root@10.50.100.111 Password: Last login: Sat Jul 2 00:46:36 2005 from 10.50.100.1 localhost root # cd /usr/src localhost src # ls -l total 420 -rw------- 1 root root 422818 Jul 1 23:57 lilo-22.6.1.src.tar.gz localhost src # tar -xzf *.gz localhost src # ls lilo-22.6.1 lilo-22.6.1.src.tar.gz localhost src # cd lilo* localhost lilo-22.6.1 # ls localhost lilo-22.6.1 # make gcc -O2 -Wall -g `if [ -f /usr/include/linux/version.h ]; . . . dd if=pseudo1.img of=pseudo1.b bs=32 skip=1 32+0 records in 32+0 records out cat pseudo1.b disk.com >diag1.img if [ -x /usr/bin/bcc -o -x /usr/local/bin/bcc ]; then make diagnostic; fi rm os2_d.o chain.img bootsect.img mbr2.o pseudo1.img os2_d.img bitmap.img disk.img second.img bootsect.o mbr.o pseudo1.o first.img third.img disk.o localhost lilo-22.6.1 # make install if [ -x /usr/bin/bcc -o -x /usr/local/bin/bcc ]; then make diagnostic; fi if [ ! -d $ROOT/sbin ]; then mkdir $ROOT/sbin; fi if [ ! -d $ROOT/etc ]; then mkdir $ROOT/etc; fi - :.*//"; else echo /usr/man; fi`/man5 /sbin/lilo must now be run to complete the update. localhost lilo-22.6.1 # localhost lilo-22.6.1 # lilo Warning: /dev/hdb is not on the first disk Added linux * |
This is a bit tricky here. The idea is that we want a bootloader on hdb. I then swapped the two IDE drives so that the new filesystem is now on hda. Note that when the lilo screen comes up, you need to boot with linux root=/dev/hda1. After rebooting, edit lilo.conf to use hda instead and rerun lilo:
localhost root # lilo Added linux * localhost root # |
This time, there are no warnings on lilo, and a reboot works fine with the new drive. Let’s look at the processes and disk usage of this new system:
localhost / # ps -aux Warning: bad ps syntax, perhaps a bogus '-'? See http://procps.sf.net/faq.html USER PID %CPU %MEM VSZ RSS TTY STAT START TIME COMMAND root 1 4.2 0.1 1364 480 ? S 01:01 0:07 init [3] root 2 0.0 0.0 0 0 ? S 01:01 0:00 [keventd] root 3 0.0 0.0 0 0 ? SN 01:01 0:00 [ksoftirqd_CPU0] root 4 0.0 0.0 0 0 ? S 01:01 0:00 [kswapd] root 5 0.0 0.0 0 0 ? S 01:01 0:00 [bdflush] root 6 0.0 0.0 0 0 ? S 01:01 0:00 [kupdated] root 949 0.0 0.4 3004 1392 ? Ss 01:02 0:00 /usr/sbin/sshd root 964 0.0 0.1 1408 572 tty1 Ss+ 01:02 0:00 /sbin/agetty 3840 root 965 0.0 0.1 1408 572 tty2 Ss+ 01:02 0:00 /sbin/agetty 3840 root 966 0.0 0.1 1408 572 tty3 Ss+ 01:02 0:00 /sbin/agetty 3840 root 967 0.0 0.1 1408 572 tty4 Ss+ 01:02 0:00 /sbin/agetty 3840 root 968 0.0 0.1 1408 572 tty5 Ss+ 01:02 0:00 /sbin/agetty 3840 root 969 0.0 0.1 1408 572 tty6 Ss+ 01:02 0:00 /sbin/agetty 3840 root 970 0.3 0.5 5820 1848 ? Rs 01:02 0:00 sshd: root@ttyp0 root 973 0.1 0.3 2072 1192 ttyp0 Ss 01:02 0:00 -bash root 986 0.0 0.2 2332 792 ttyp0 R+ 01:04 0:00 ps -aux localhost / # localhost / # df Filesystem 1K-blocks Used Available Use% Mounted on /dev/ROOT 867096 328960 494088 40% / localhost / # |
Pretty minimal system. Now, let’s install XAMPP:
localhost opt # cd /opt localhost opt # ls localhost opt # ls / bin dev home lost+found opt root sys usr xampp-linux-1.4.14.tar.gz boot etc lib mnt proc sbin tmp var localhost opt # tar -xzf /xampp*.gz localhost opt # localhost opt # cd lampp localhost lampp # ls RELEASENOTES cgi-bin htdocs lib modules sbin var backup error icons licenses phpmyadmin share bin etc lampp logs phpsqliteadmin tmp localhost lampp # |
That really is the extent of the installation process. Let’s start XAMPP:
localhost lampp # ./lampp start Starting XAMPP for Linux 1.4.14... XAMPP: Starting Apache with SSL (and PHP5)... XAMPP: Starting MySQL... XAMPP: Starting ProFTPD... XAMPP for Linux started. localhost lampp # localhost lampp # ps -ef UID PID PPID C STIME TTY TIME CMD root 1 0 0 01:18 ? 00:00:07 init [3] root 2 1 0 01:18 ? 00:00:00 [keventd] root 3 1 0 01:18 ? 00:00:00 [ksoftirqd_CPU0] root 4 1 0 01:18 ? 00:00:00 [kswapd] root 5 1 0 01:18 ? 00:00:02 [bdflush] root 6 1 0 01:18 ? 00:00:00 [kupdated] root 945 1 0 01:18 ? 00:00:00 /usr/sbin/sshd root 960 1 0 01:18 ? 00:00:00 login -- root root 961 1 0 01:18 tty2 00:00:00 /sbin/agetty 38400 tty2 linux root 962 1 0 01:18 tty3 00:00:00 /sbin/agetty 38400 tty3 linux root 963 1 0 01:18 tty4 00:00:00 /sbin/agetty 38400 tty4 linux root 964 1 0 01:18 tty5 00:00:00 /sbin/agetty 38400 tty5 linux root 965 1 0 01:18 tty6 00:00:00 /sbin/agetty 38400 tty6 linux root 966 960 0 01:18 tty1 00:00:00 -bash root 977 945 0 01:22 ? 00:00:03 sshd: root@ttyp0 root 980 977 0 01:22 ttyp0 00:00:00 -bash root 1062 1 1 01:32 ? 00:00:01 /opt/lampp/bin/httpd -k start -D root 1079 1 0 01:32 ttyp0 00:00:00 /bin/sh /opt/lampp/bin/mysqld_sa nobody 1087 1 0 01:32 ? 00:00:00 proftpd: (accepting connections) nobody 1117 1079 0 01:32 ttyp0 00:00:00 /opt/lampp/sbin/mysqld --basedir nobody 1118 1117 0 01:32 ttyp0 00:00:00 /opt/lampp/sbin/mysqld --basedir nobody 1119 1118 0 01:32 ttyp0 00:00:00 /opt/lampp/sbin/mysqld --basedir nobody 1120 1062 0 01:32 ? 00:00:00 /opt/lampp/bin/httpd -k start -D nobody 1121 1062 0 01:32 ? 00:00:00 /opt/lampp/bin/httpd -k start -D nobody 1122 1062 0 01:32 ? 00:00:00 /opt/lampp/bin/httpd -k start -D nobody 1123 1062 0 01:32 ? 00:00:00 /opt/lampp/bin/httpd -k start -D nobody 1124 1062 0 01:32 ? 00:00:00 /opt/lampp/bin/httpd -k start -D nobody 1125 1062 0 01:32 ? 00:00:00 /opt/lampp/bin/httpd -k start -D root 1127 980 0 01:33 ttyp0 00:00:00 ps -ef localhost lampp # |
We are only using 509 megs:
localhost / # df Filesystem 1K-blocks Used Available Use% Mounted on /dev/ROOT 867096 509616 313432 62% / localhost / # |
To administer the new system, just browse to the host:
Note that the XAMPP project says:
As mentioned before, XAMPP is not meant for production use but only for developers in a development environment. The way XAMPP is configured is to be open as possible and allowing the developer anything he/she wants. For development environments this is great but in a production environment it could be fatal.
So, be careful about this. Our focus is on using this in a quick recovery scenario, plus, we wanted to see just how few dependencies there really were.


