Windows PowerShell is a cross-platform task automation solution with an interactive command-line shell that simplifies configurations and automates administrative tasks. Microsoft created Window PowerShell to control and automate the administration tasks run on the Windows Server Environment.
The tool is gaining popularity among sysadmins and experienced Windows users. It helps automate almost any task in the Windows ecosystem.
With the help of its latest version, administrators can easily manage Windows server OS and control Lync-based servers, Exchange, and SQL. A PowerShell comprises a command-line shell, a scripting language, and a configuration management framework that aid in batch processing, script automation, and controlling resources in the cloud.
Compared to VBScript and cmd.exe, Windows PowerShell supports various functions and allows the execution of a .NET code. Also, Windows PowerShell is available in several versions and is easy to learn and implement.
Features of Windows PowerShell
The popular tool is built on the .NET framework, Common Language Runtime, and Dynamic Language Runtime with old CMD functionality and new scripting instruction sets. It comprises various features that make it simple for sysadmins to access and manage the execution of scripts, cmdlets, and language elements.
Here are a few vital features of Windows PowerShell:
- Windows PowerShell Workflow The Windows PowerShell version 3.0 introduced workflow capabilities that made it easier for sysadmins to perform time-consuming complex tasks. With the help of this feature, sysadmins can now perform complex tasks across multiple devices at different locations.
- Desired State Configuration Sysadmins can easily configure the software with the help of the DSC feature available in Windows PowerShell. This feature provides a collection of language extensions, resources, and cmdlets that simplifies the configuration process.
- Background Job Another excellent feature supported by Windows PowerShell is the Background Job. This feature helps users run scripts and cmdlets in the background on the remote and local machines without creating any negative impact on the user interface.
- The Module cmdlets Using Windows PowerShell remoting, users can import modules and execute cmdlets available on remote computers to the local computers.
- Scheduled job The scheduled job feature is quite similar to the background job. Under this feature, all the background jobs executed asynchronously are started manually.
- Script debugging This feature allows users to cross-check the script, function, command, and expressions when running PowerShell. Sysadmins can also manage breakpoints with the help of cmdlets sets supported by the PowerShell script debugger.
In this post, we will show how to install PowerShell Modules on Windows systems.
Install PowerShell Modules Manually
You will need to install the PowerShell module manually if your required module is not available in the PowerShell gallery. Follow the below steps to install the PowerShell module manually.
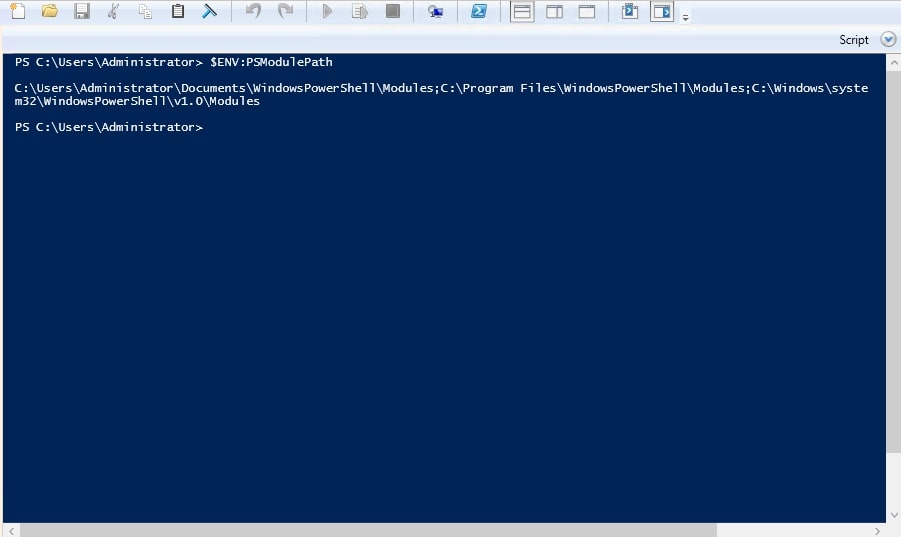
Step 1 – First, open the PowerShell as an administrator user and find the PowerShell module default installation path using the following command:
$Env:PSModulePath
You should see the PowerShell module default installation path in the following screen:
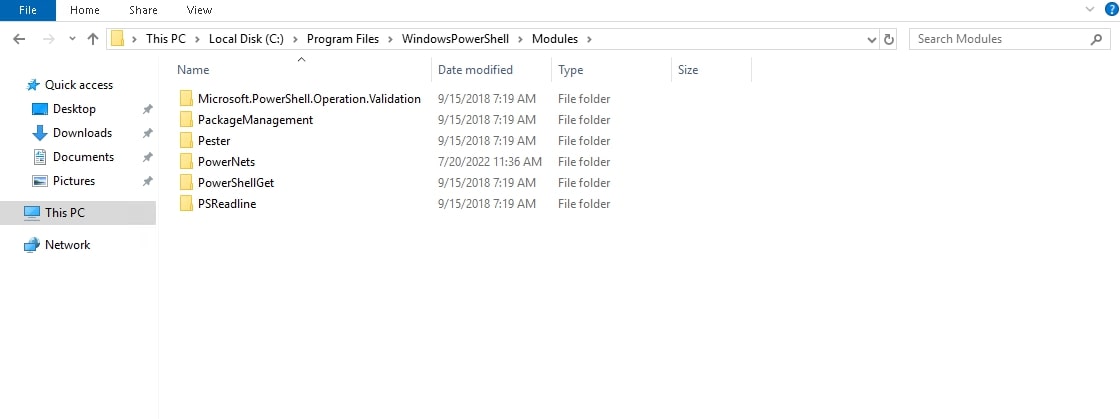
Step 2 – Next, download the PowerShell module named PowerNet from the Internet and copy it into the PowerShell default path:
Step 3 – Next, run the following command to verify the newly added module visible to PowerShell:
Get-Module -ListAvailable
You should see your newly added PowerNet module in the following output:
Manifest 2.0.0.0 NetSecurity {Get-DAPolicyChange, New-NetIPsecAuthProposal, New-NetIP...
Manifest 1.0.0.0 NetSwitchTeam {New-NetSwitchTeam, Remove-NetSwitchTeam, Get-NetSwitchT...
Manifest 1.0.0.0 NetTCPIP {Get-NetIPAddress, Get-NetIPInterface, Get-NetIPv4Protoc...
Manifest 1.0.0.0 NetworkConnectivityStatus {Get-DAConnectionStatus, Get-NCSIPolicyConfiguration, Re...
Manifest 1.0.0.0 NetworkSwitchManager {Disable-NetworkSwitchEthernetPort, Enable-NetworkSwitch...
Manifest 1.0.0.0 NetworkTransition {Add-NetIPHttpsCertBinding, Disable-NetDnsTransitionConf...
Manifest 1.0 NFS {Get-NfsMappedIdentity, Get-NfsNetgroup, Install-NfsMapp...
Script 0.0 PowerNet {Test-TCPPort, Enable-Monitoring, Disable-Monitoring, Writ...
Manifest 1.0.0.0 PcsvDevice {Get-PcsvDevice, Start-PcsvDevice, Stop-PcsvDevice, Rest...
Binary 1.0.0.0 PersistentMemory {Get-PmemDisk, Get-PmemPhysicalDevice, Get-PmemUnusedReg...
Manifest 1.0.0.0 PKI {Add-CertificateEnrollmentPolicyServer, Export-Certifica...
Manifest 1.0.0.0 PlatformIdentifier Get-PlatformIdentifier
Manifest 1.0.0.0 PnpDevice {Get-PnpDevice, Get-PnpDeviceProperty, Enable-PnpDevice,...
Manifest 1.1 PrintManagement {Add-Printer, Add-PrinterDriver, Add-PrinterPort, Get-Pr...
Binary 1.0.11 ProcessMitigations {Get-ProcessMitigation, Set-ProcessMitigation, ConvertTo...
Manifest 1.1 PSDesiredStateConfiguration {Set-DscLocalConfigurationManager, Start-DscConfiguratio...
Step 4 – Next, load the added module to the active memory so you can access it in your current session:
Import-Module -Name PowerNet
You will get the following warning message:
Security warning
Run only scripts that you trust. While scripts from the internet can be useful, this script can potentially harm your
computer. If you trust this script, use the Unblock-File cmdlet to allow the script to run without this warning
message. Do you want to run C:\Program Files\WindowsPowerShell\Modules\PowerNet\PowerNet.psm1?
[D] Do not run [R] Run once [S] Suspend [?] Help (default is "D"):
Type R and press the Enter key to load the module. You will get another error message:
import-module : File C:\Program Files\WindowsPowerShell\Modules\PowerNet\PowerNet.psm1 cannot be loaded because running scripts is disabled on this system.
To resolve this error, you must set the execution policy unrestricted. You can set it with the following command:
Set-ExecutionPolicy Unrestricted
Install PowerShell Module from PowerShell Gallery
The simple and easiest way to install the PowerShell module is to install it from the PowerShell gallery. Follow the below steps to install the PowerShell module:
Step 1 – First, you will need to install the Nuget package on your system. You can install it by running the following command:
Install-PackageProvider Nuget –Force
Once installed, you should see the following output:
Name Version Source Summary
---- ------- ------ -------
nuget 2.8.5.208 https://onege... NuGet provider for the OneGet meta-package manager
Step 2 – Next, you will also need to install the PowerShellGet on your system. PowerShellGet is a module that provides commands to find, update and publish modules, scripts and resources. You can install it with the following command:
Install-Module –Name PowerShellGet –Force
Step 3 – Now, let’s install the module named NTFSSecurity from the PowerShell gallery using the following command:
Install-Module -Name NTFSSecurity
You will get the following warning:
Untrusted repository
You are installing the modules from an untrusted repository. If you trust this repository, change its
InstallationPolicy value by running the Set-PSRepository cmdlet. Are you sure you want to install the modules from
'PSGallery'?
[Y] Yes [A] Yes to All [N] No [L] No to All [S] Suspend [?] Help (default is "N"):
Answer Yes to All and press the Enter key to install the NTFSSecurity module.
Step 4 – You can now see the detailed information of the installed module by running the following command:
Get-Command -module NTFSSecurity
You will get the following output:
CommandType Name Version Source
----------- ---- ------- ------
Cmdlet Add-NTFSAccess 4.2.6 NTFSSecurity
Cmdlet Add-NTFSAudit 4.2.6 NTFSSecurity
Cmdlet Clear-NTFSAccess 4.2.6 NTFSSecurity
Cmdlet Clear-NTFSAudit 4.2.6 NTFSSecurity
Cmdlet Copy-Item2 4.2.6 NTFSSecurity
Cmdlet Disable-NTFSAccessInheritance 4.2.6 NTFSSecurity
Cmdlet Disable-NTFSAuditInheritance 4.2.6 NTFSSecurity
Cmdlet Disable-Privileges 4.2.6 NTFSSecurity
Cmdlet Enable-NTFSAccessInheritance 4.2.6 NTFSSecurity
Cmdlet Enable-NTFSAuditInheritance 4.2.6 NTFSSecurity
Cmdlet Enable-Privileges 4.2.6 NTFSSecurity
Cmdlet Get-ChildItem2 4.2.6 NTFSSecurity
Cmdlet Get-DiskSpace 4.2.6 NTFSSecurity
Cmdlet Get-FileHash2 4.2.6 NTFSSecurity
Cmdlet Get-Item2 4.2.6 NTFSSecurity
Cmdlet Get-NTFSAccess 4.2.6 NTFSSecurity
Cmdlet Get-NTFSAudit 4.2.6 NTFSSecurity
Cmdlet Get-NTFSEffectiveAccess 4.2.6 NTFSSecurity
Cmdlet Get-NTFSHardLink 4.2.6 NTFSSecurity
Cmdlet Get-NTFSInheritance 4.2.6 NTFSSecurity
Cmdlet Get-NTFSOrphanedAccess 4.2.6 NTFSSecurity
Cmdlet Get-NTFSOrphanedAudit 4.2.6 NTFSSecurity
Cmdlet Get-NTFSOwner 4.2.6 NTFSSecurity
Cmdlet Get-NTFSSecurityDescriptor 4.2.6 NTFSSecurity
Cmdlet Get-NTFSSimpleAccess 4.2.6 NTFSSecurity
Cmdlet Get-Privileges 4.2.6 NTFSSecurity
Cmdlet Move-Item2 4.2.6 NTFSSecurity
Cmdlet New-NTFSHardLink 4.2.6 NTFSSecurity
Cmdlet New-NTFSSymbolicLink 4.2.6 NTFSSecurity
Cmdlet Remove-Item2 4.2.6 NTFSSecurity
Cmdlet Remove-NTFSAccess 4.2.6 NTFSSecurity
Cmdlet Remove-NTFSAudit 4.2.6 NTFSSecurity
Cmdlet Set-NTFSInheritance 4.2.6 NTFSSecurity
Cmdlet Set-NTFSOwner 4.2.6 NTFSSecurity
Cmdlet Set-NTFSSecurityDescriptor 4.2.6 NTFSSecurity
Cmdlet Test-Path2 4.2.6 NTFSSecurity
Conclusion
In this post, we explained different ways to install the PowerShell module on Windows. You can now choose your preferred method to install your desired PowerShell module to perform complex administrative tasks with its command-line and script language. The PowerShell tool can work on all major operating systems such as Windows, Linux, and mac OS X.


