[Ed. Note: This is a wee bit dated.
SSH is widely available for Windows now, and should be used instead of telnet for administration.
Still, telnet can be handy for testing.
For an updated version of this for Windows 2000, see this article.]
We wrote a tip about using IIS and rconsole to remotely manage your NT server.
One problem with rconsole, is that the client doesn’t usually exist by default.
Also, it requires a Windows platform to operate. There is a beta version of telnet in the NT server 4.0 resource kit.
We will also show you how to use the version of telnetd that comes with Interix.
The cool thing about using telnet over rconsole is that you can manage your NT server from any platform with telnet. This is particularly true now that perl can do so much system administration.
Don’t get us wrong, the NT GUI is the best GUI for system administration that we have ever touched.
We have just found that for larger networks, the automation possible using scripting and command-line utilities make administration more accurate and quick.
Also, Microsoft is continually adding command line utilities to manage WINS, DHCP, event logs, and others.
Another cool thing is that telnetd runs as a service that is not related to the GUI. We have seen NT machines that are entirely unresponsive at the GUI, but command line utilities run fine. Another problem with rconsole is that the password shows up in the title bar.
One final warning.
One disadvantage of telnet is that it passes clear text passwords.
It would be easy for somebody who was sniffin’ on your network to find out your password.
Installing telnetd from the NT resource kit:
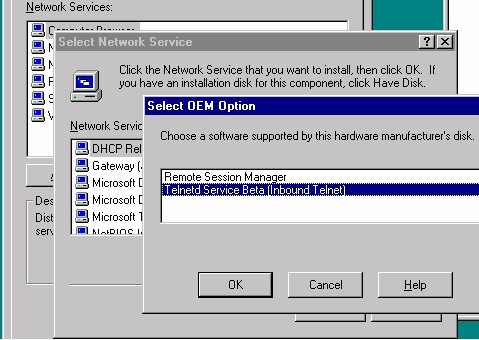
First, make sure that oemsetup.inf is dated 11/18/96 or later (see below). To install telnet (telnetd or telnet daemon), go into your network/services panel, choose add, and have disk.
You need to install both the Remote Session Manager and the Telnetd Service. For updates to telnetd, go to:
ftp://ftp.microsoft.com/bussys/winnt/winnt-public/reskit/nt40/telnetd/
As of July 1999, the most recent files we can find for MS telnetd are from November 1996.
When you are finished, and all rebooted, just go to any workstation with telnet, and type telnet <hostname>.
If your server was named srv-4, you could type:
telnet srv-4
Then you will see something like this:
Welcome to the Telnet Service on ANAKIN
Username: vader
Password:
ECHO is off.
Welcome to the Telnet Service Beta. This service is still a
work in progress. Please check the following ftp location for
the most current version of this tool:
ECHO is off.
ftp ntrk.microsoft.com elnetd
ECHO is off.
To report bugs or request more Telnetd information please email
me at telnetd@ntrk.microsoft.com.
ECHO is off.
C:WINNTsystem32>
Note that the server listed for updates is not correct.
Installing telnetd from Interix:
[Ed. Note: Microsoft purchased Interix, and the product is now available here.]
Ooooo… we love this so much better. Just type a couple commands at the Interix shell:
$ service install -u Administrator -p <password> //F/Interix/bin/telnetd
Service Logon privileges have been granted to user REMOTE1Administrator.
To revoke these privileges, use "service revoke 'REMOTE1Administrator'".
The Posix service "telnetd" has been successfully installed.
To start the service, use "service start telnetd".
$ service start telnetd
Starting service telnetd.
service telnetd started.
$
No reboot is needed.
From the client:
telnet srv-4
Interix 2.2 (ANAKIN) (ttyp0)
NOTE:
The default NT Domain used during login is identified within
the parentheses of the login prompt below "(REMOTE1)".
If there is no default value or if you want to login using a
different NT Domain then ensure that a Domain name is prefixed
to the login name in the form of DomainName+loginName
(REMOTE1) login: u-1
Password:
Copyright (c) 1995-1998
Softway Systems, Inc. All rights reserved.
Welcome to the Interix Commands and Utilities
DISPLAY=ANAKIN:0.0
$
Of course, from here we have a much more powerful shell to work from in automating our administration tasks.


