To start configuring Active Directory from a Windows machine, you’ll need RSAT tools, which include Server Manager and other vital consoles like PowerShell. From the “Server Manager,” you’ll be able to monitor your server and add new key roles and features like AD DS and DNS— tools necessary to start with Active Directory.
In this Active Directory tutorial, you’ll learn how to set up Active Directory from scratch. We’ll provide you with step-by-step guidance into installing RSAT to log and manage AD, and we’ll also go through the process of installing Active Directory Domain Services (AD DS) to set up an Active Directory Forest and Domain Controller. Finally, we’ll configure the DNS server zones and wrap up with additional key settings.
Table of Contents
- Installing RSAT Tools
- Installing and running the AD DS On the Windows Server 2019
- Creating an Active Directory Forest and Domain
- Configure the Active Directory DNS server zones
- Additional Active Directory Setup
1. Setup Active Directory with RSAT
To set up Active Directory, you’ll need to have Microsoft Remote Server Administration Tools (RSAT) running on a Windows machine. RSAT allows IT admins to remotely manage the roles and features in Windows Server 2012 and 2016. RSAT includes the Server Manager, Microsoft Management Console (MMC) snap-ins, PowerShell cmdlets, consoles, and additional command-line tools to administer Windows Server’s roles and features.
- RSAT is compatible with Windows servers running Windows 10, Windows 8.1, Windows 8, Windows 7, or Windows Vista.
- You can install RSAT 10 only in the full edition of Windows Professional, Windows Enterprise, or Windows Education versions.
- You cannot install RSAT in Windows Home, Standard edition, or on computers running Windows RT 8.1
How to install RSAT?
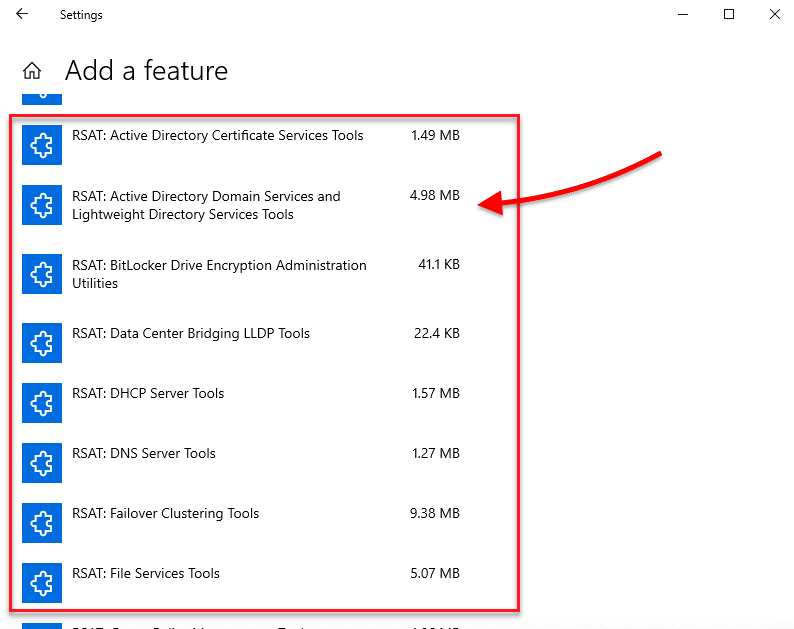
If you have the Windows 10 Oct 2018 update (1809) or later, RSAT is already included as a set of Features on Demand.
- Go to Settings > Click on “Apps” > Apps & Features > Manage Optional Features > Add Feature.
- Scroll down, find, and select RSAT: Active Directory Domain Services and Lightweight Directory Tools. Click on Install.
Prior to the October 10 update (1809) – Windows 8 or Windows 10 (1803)
- Download RSAT for Windows 10 from Microsoft’s official site.
- Double-click on the installer (.msu) and click on “Install”. Go on and accept the license terms and wait for the installation to finish.
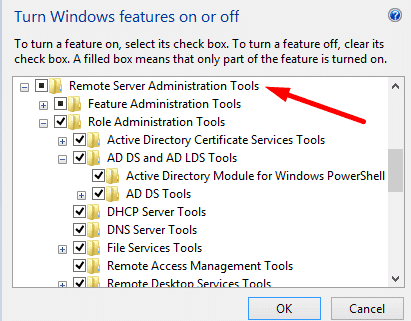
- Go to Control Panel > Programs > Programs and Features > Turn Windows features on or off.
- Scroll down, find, and expand the “Remote Server Administration Tools”.
- Click on Role Administration Tools. Ensure that “AD DS and AD LDS Tools” are selected. Click on “AD DS and AD LDS Tools” to verify that Active Directory Module for Windows PowerShell and AD DS Tools are checked.
2. Installing and running the AD DS On the Windows Server 2019
Active Directory Domain Services (AD DS) provide the core Active Directory functions that manage users and computers. The server running the AD DS role is considered the Domain Controller (DC). This server authenticates and authorizes all users and computers within a Windows domain. It also assigns and enforces security policies and pushes software installs and updates.
To set up Active Directory DS on a Windows Server 2019, you’ll need the following:
- The administrative privileges on the server.
- Server with a static IP address.
- Knowing the organizational naming standards.
How to install the AD DS role
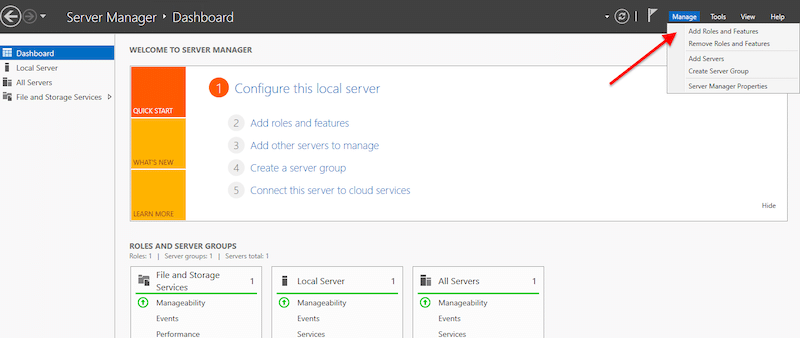
- Open Server Manager > Manage > Add Roles and Features.
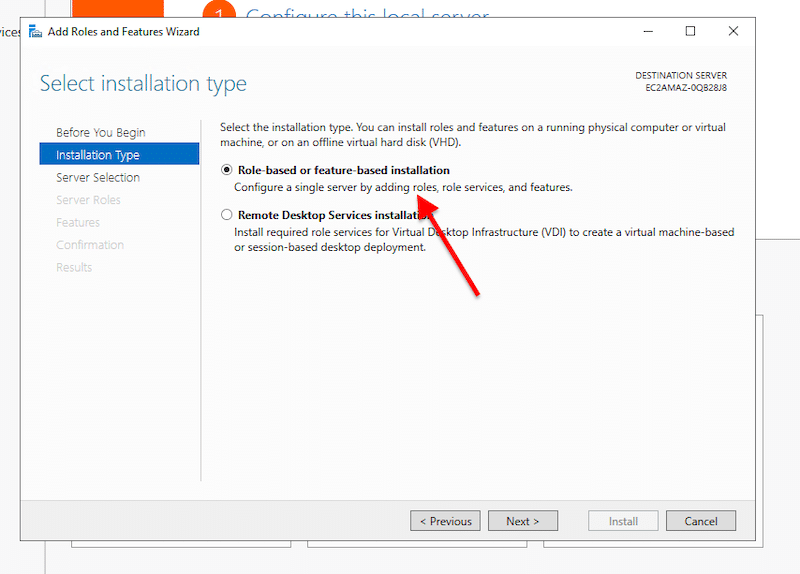
- On Installation Type, choose the “Role-based or feature-based installation” and click on Next.
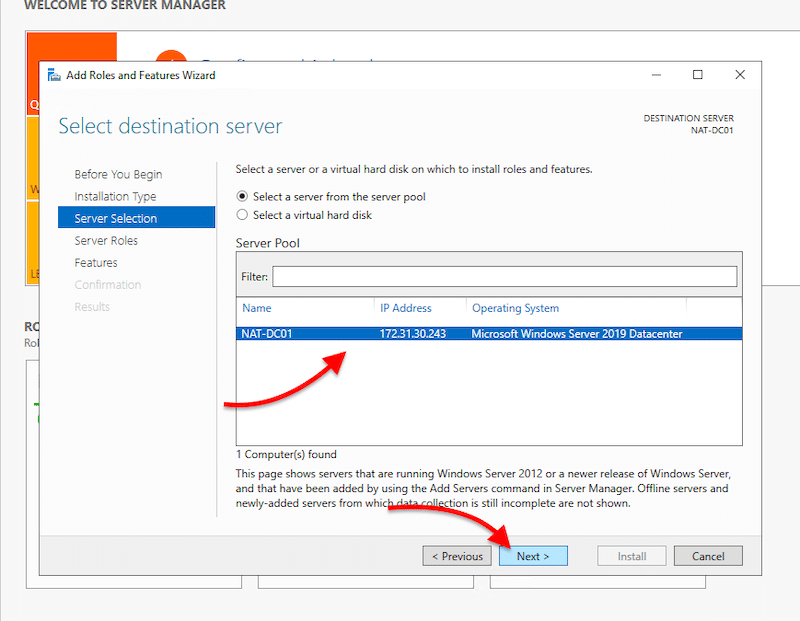
- On Server Selection, you’ll need to select your local server (or any remote server) where you wish to install the AD DS role. This option shows our local server, NAT-DC01, with an IP and the OS version.
- Go ahead and select your server and click on Next.
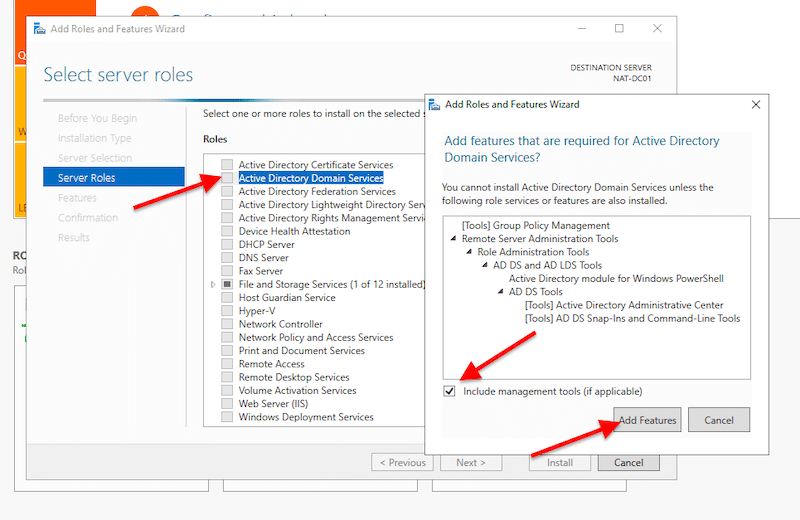
- On Server Roles, find and select “Active Directory Domain Services”. Once you choose that option, a new pop-up window will appear. This window shows the features required for AD DS that you will need to include. Go ahead and click on “Include management tools” and click on “Add Features”.
- If your AD Server also has the DNS server role, you’ll need to select it here. Scroll down to “DNS Server” and include the required features. For your server to be a DNS server, you’ll need to have a static IP address.
- On Features, AD DS, and DNS Server, click on “Next”.
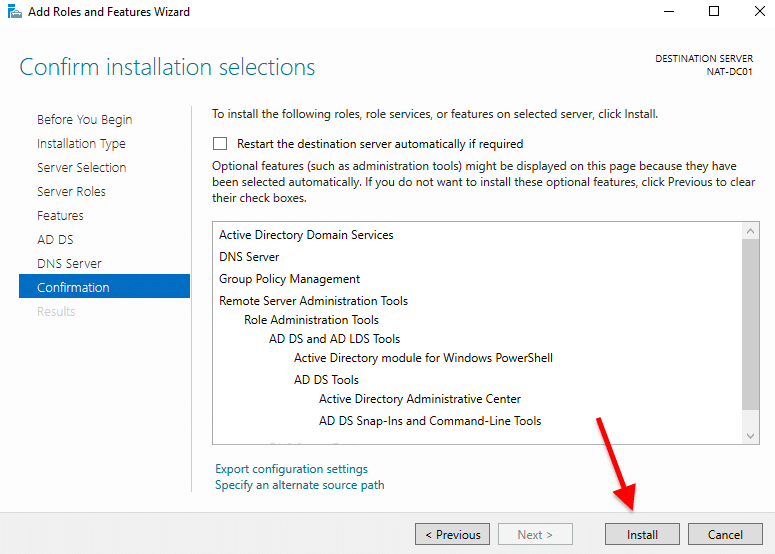
- On Confirmation, verify your configuration and click on “Install”.
- Wait for your installation to finish. Don’t close the “Results” step on the Installation wizard yet.
3. Creating an Active Directory Forest and Domain
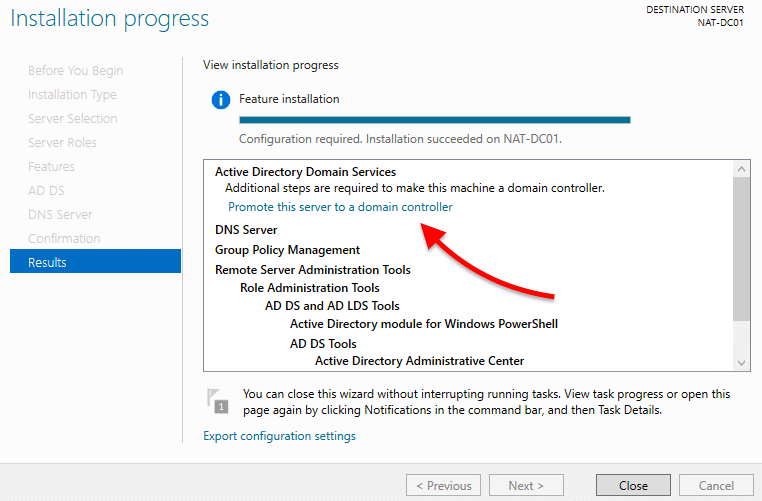
Once the installation is booming, and before closing the Installation wizard, go ahead and select “Promote this server to a domain controller”.
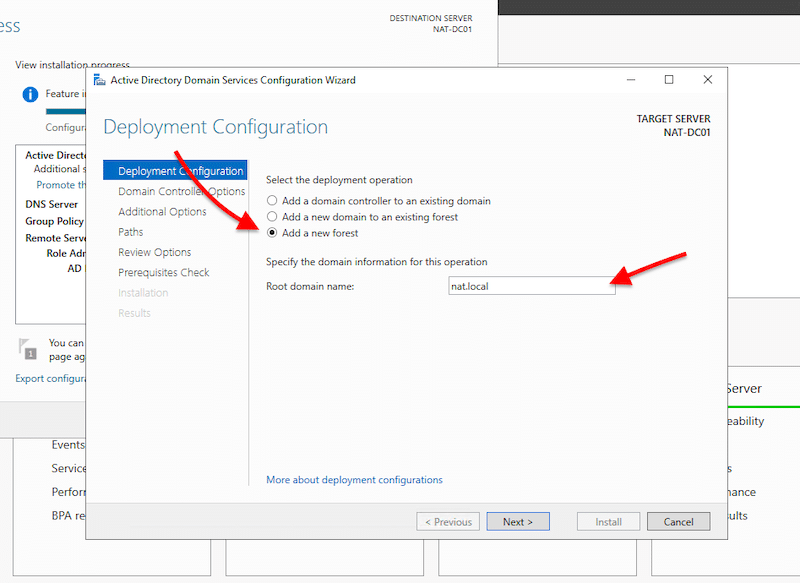
- A new Active Directory Domain Services Configuration Wizard will open. This contains three options for deployment: “Add a domain controller to an existing domain”, “Add a new domain to an existing forest”, or “add a new forest”. Since we are starting from scratch, we are going to create a brand new forest.
Note: Before creating your first Domain Controller, you’ll need a forest, and before a forest, you’ll need a valid root domain. All Active Directory clients use the DNS protocol to find domain controllers, and all domain controllers also use DNS to communicate. An example of an AD root domain name can be something like “nat. local” or “nat-internal.company.com,” where “nat-internal” is the internal AD domain name, and “company.com” is the external resources name.
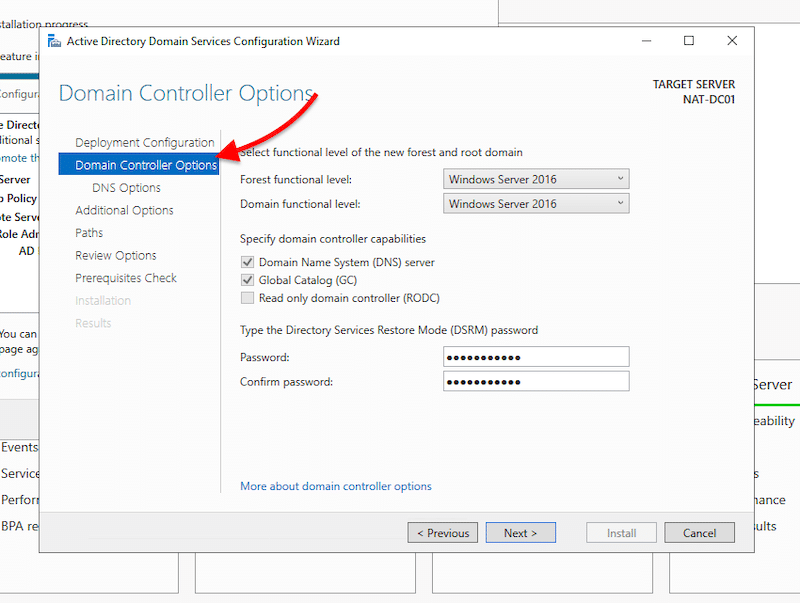
- In the next screen: “Domain Controller Options”, you’ll be able to select the functional level of the new forest and root domain.
Note: The functional levels are the controls that specify the AD DS features used in the domain or forest. As of Nov 2020, the latest available levels are those of Windows Server 2016.
- Specify the domain controller capabilities. Since this is the first AD domain controller, check the DNS server and Global Catalog boxes.
- Give the Directory Services Restore Mode (DSRM) a password. And click on “Next”.
- Skip DNS Options. No need for DNS Delegation now.
- In Additional Options, you’ll see the NetBIOS domain name taken from the root domain. But you are also free to change it.
- In Paths, you’ll be able to specify the location of the AD DS database, log files, and SYSVOL folders.
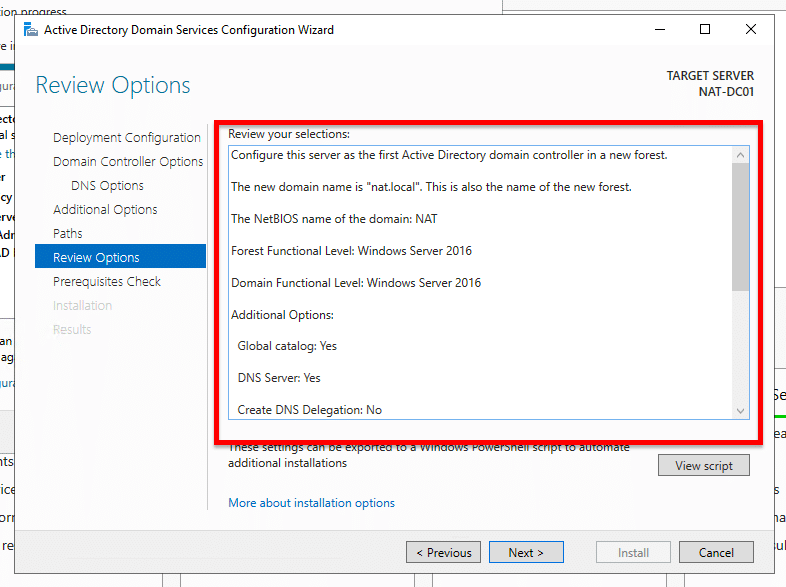
- In review options, you’ll be able to check your configuration and go back if you want to make any changes before installation.
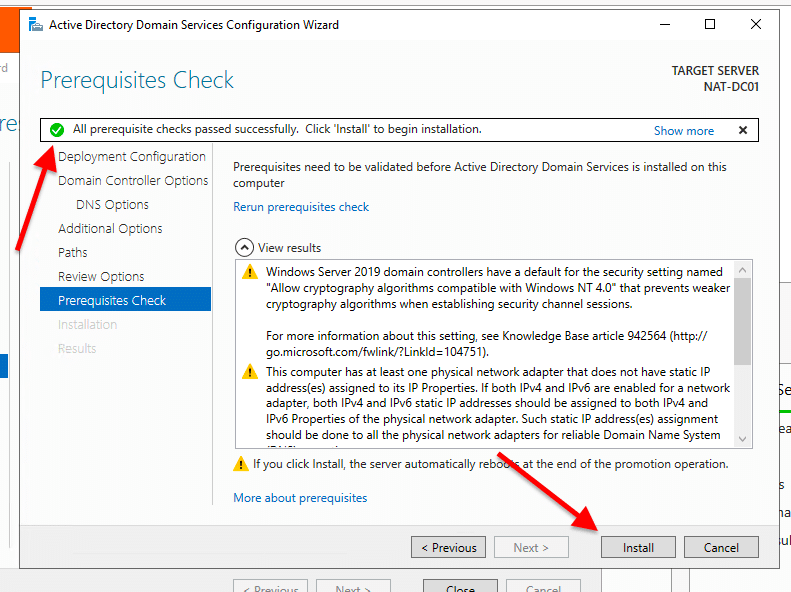
- The Prerequisites Check will show you a checklist with warnings or critical alarms. If the check passes, it will show a green light, and you’ll be able to install AD DS with the new domain controller and forest. You can take care of these warnings later on.
- Click Install. The server will install and restart automatically.
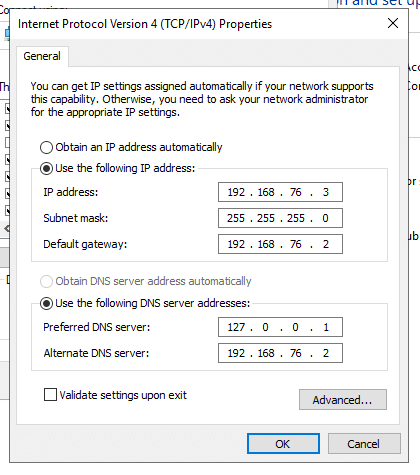
Note: If you got a similar message as mine (this server has one physical network adapter that does not have a static IP address), it is because you didn’t configure the static IP. To do this, go to Control Panel >Network & Internet > Network Connections > Select Ethernet adapter > right-click and go to Properties. In Ethernet Properties, select IPv4 and click on Properties.
- Select “Use the following IP address”. Then, according to your IP addressing scheme, give your server the IP address, subnet, and default gateway information, along with DNS information (your IP).
As you might notice, the server is using 127.0.0.1 (loopback IP address) because the server itself is acting as a DNS server. Therefore, you’ll need to change “Preferred DNS Server” to the static IP address of your server (192.168.76.3, for example).
Verify your configuration
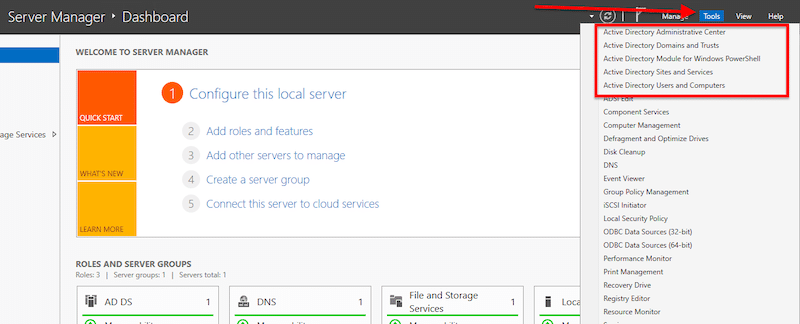
- Access the AD DS management console. Go to “Server Manager” and click on “Tools”.
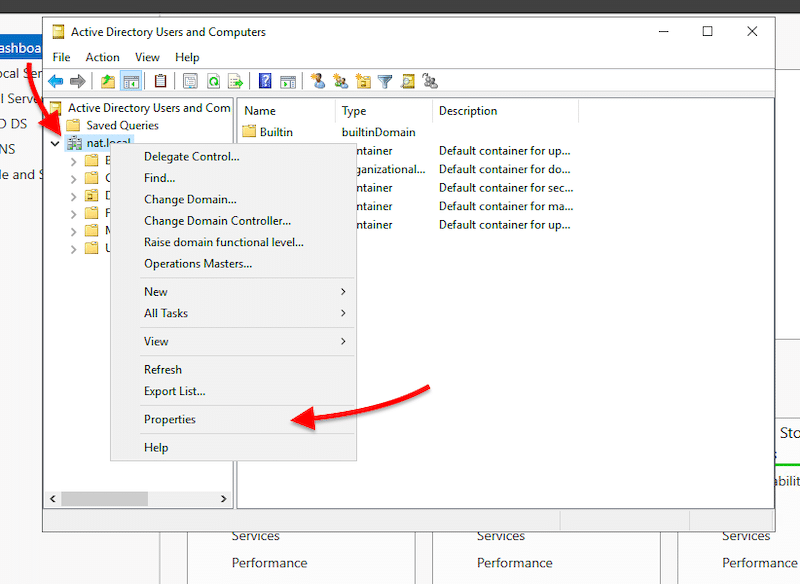
- Open “Active Directory Users and Computers” to ensure the naming and functional levels of your new DC are correct. Next, explore your domain controller (nat. local in our case) by right-clicking on it and opening “Properties”.
- On properties, verify your DC name and functional level.
4. Configure the Active Directory DNS server zones
You already installed AD DS, the DNS role, and created a new forest and DC. Now you’ll only need to configure the DNS zones.
A DNS zone is formed by resource records (IP blocks and naes) used to resolve DNS queries. The most common zone type in Active Directory is the Active Directory-integrated DNS zone. To learn more about Active Directory and zones, check this great guide to terminology, definitions, and fundamentals.
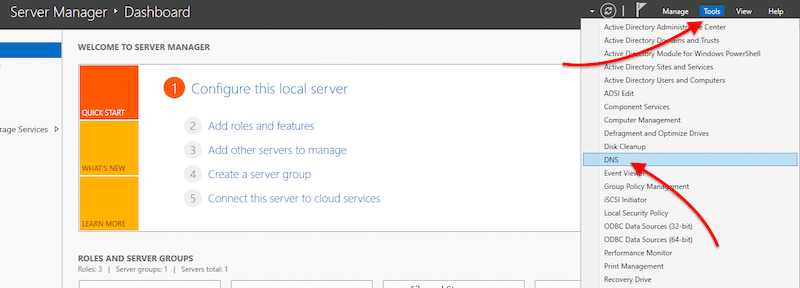
- Open “Server Manager” > Go to “Tools” > Click on “DNS”.
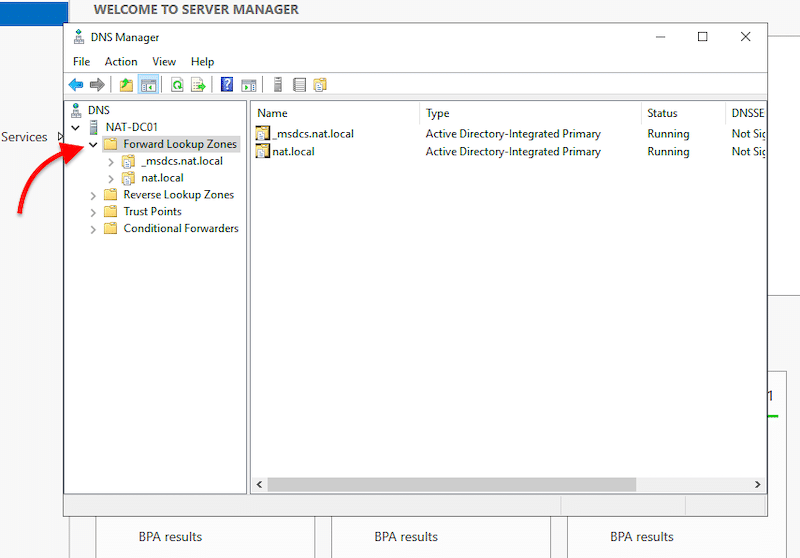
- Within DNS, expand your server and open “Forward Lookup Zones”. You’ll notice two AD integrated primary DNS zones. The “nat. local” is the root domain name we assigned in the previous AD DS configuration process. The _msdcs zone is a separate zone stored in the application partition. This zone is replicated to every DC that is a DNS server.
- As you notice, the Forward lookup zones are already there, but now, you’ll need to create a reverse lookup zone.
Note: Forward Lookup Zones vs Reverse Lookup Zones? Forward lookup zones resolve names to IP addresses, while reverse lookup zones resolve IP addresses to names.
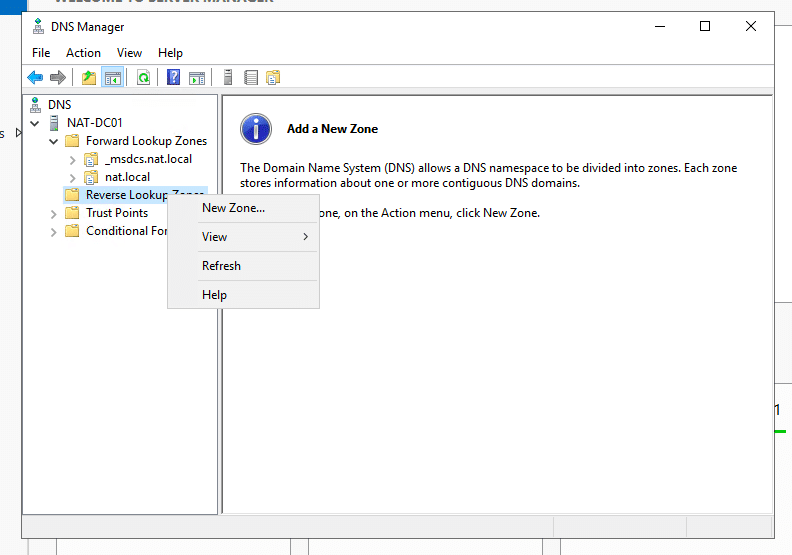
- Now, let’s configure the reverse lookup zone. First, Right-click on “Reverse Lookup Zone” and click “New Zone…”
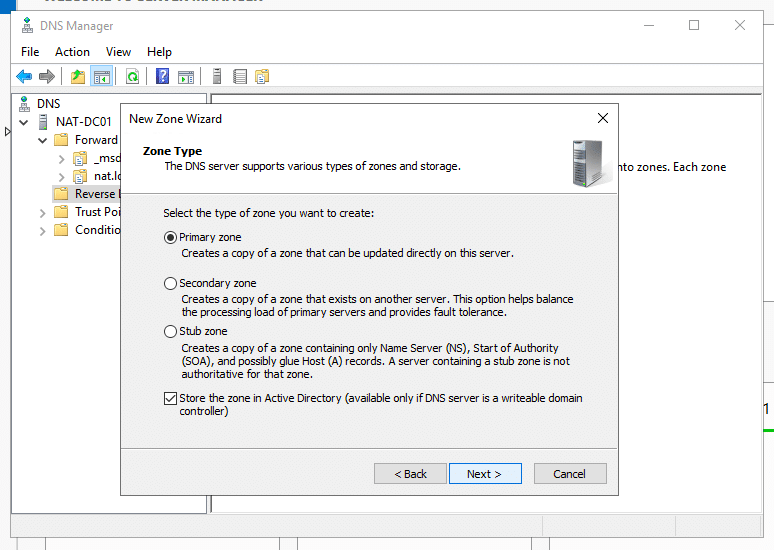
- In the New Zone Wizard, leave the zone type as “primary zone” and check the “Store the zone in Active Directory” box. Then, click “Next”.
- In “AD Zone Replication Scope,” how do you want DNS data to be replicated? select, “To all DNS Servers running on domain controllers in this domain: (your domain name)”.
- On the next screen, select “IPv4 reverse lookup zone” and click “Next”.
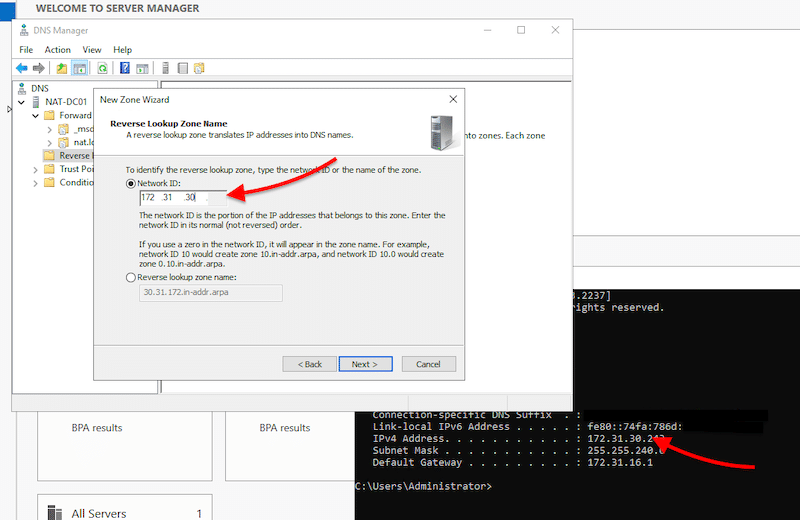
- Specify the Network ID of the reverse zone to help identify the reverse lookup zone. These first three octets are the network ID of your server.
- If you don’t know your server IPv4 address, use the “cmd” utility and the “ipconfig” command.
- Click on “Next” > “Next” > and “Finish”.
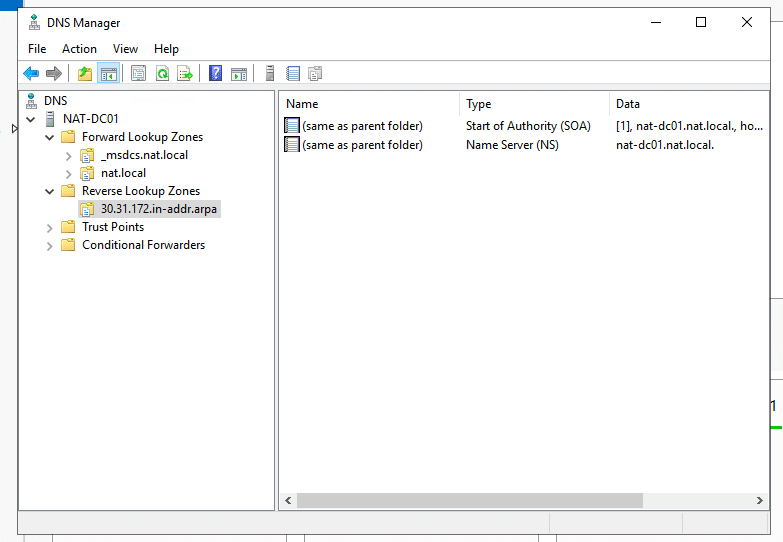
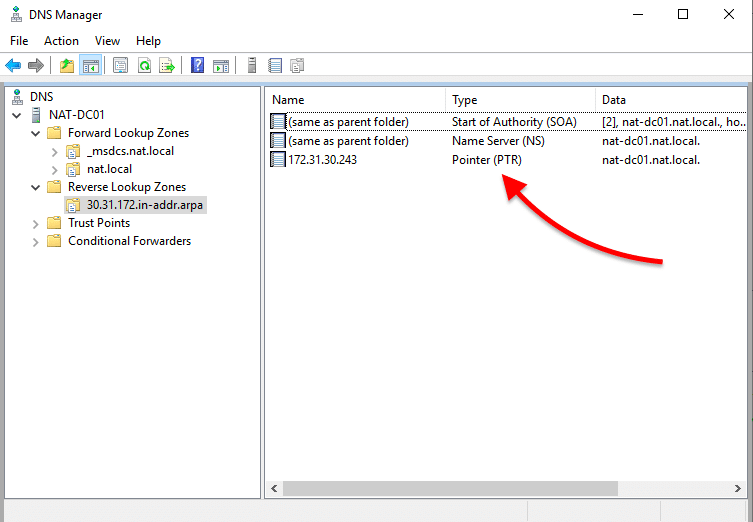
- Check your new reverse lookup zone. Inside, you should see two DNS resource records, SOA and NS.
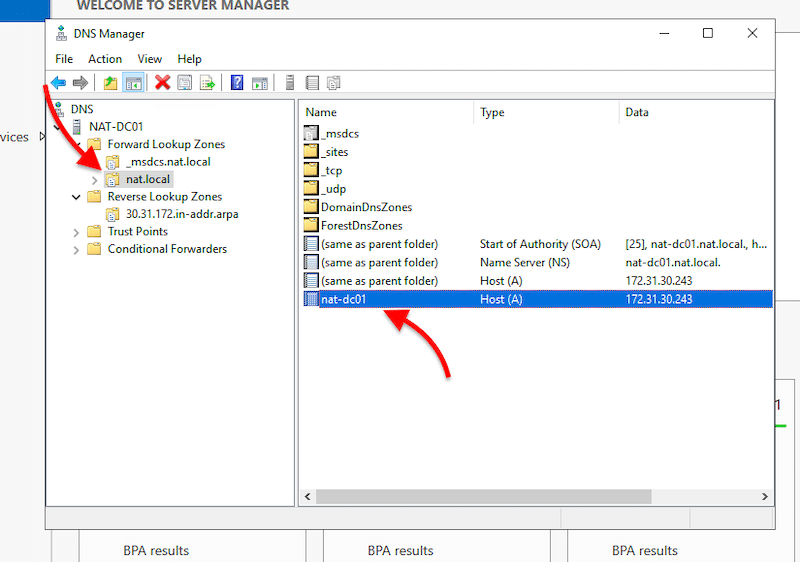
- Update your A record. The A record, also known as the host record or DNS host, is in your domain’s DNS zone file. It makes the connection between domains and matching IP addresses. In other words, the A record contains the hostnames with their associated IPv4 addresses.
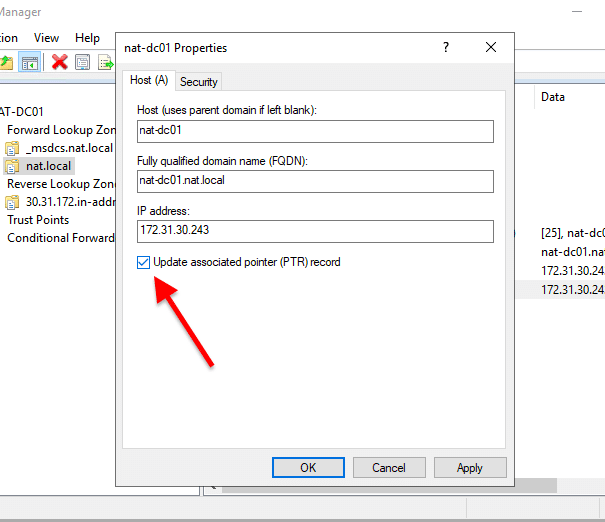
- To enable the reverse lookups, you’ll need to allow the Pointer (PTR) Record. The PTR record creates a pointer that maps the IPv4 address to a hostname.
- Right-click on the Host A record and click on “Properties”. A new “Properties” window will appear. First, check the box, “Update associated pointer (PTR) record”. Then, click on Apply > Ok.
- Verify your reverse lookup zone. If you don’t see the PTR record in the reverse lookup zone, you’ll need to refresh. Right-click on the blank space and click on “refresh”. The new PTR record should appear.
Rename your AD Domain Server
Optional: If you want to configure a new DNS server, you’ll need to rename your current Domain server and create new zones.
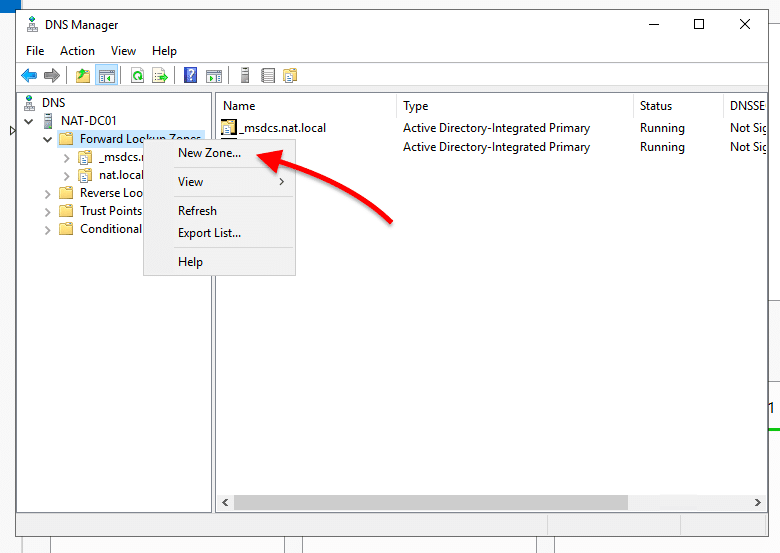
- Open DNS Manager, open your server, and expand “Forward Lookup Zones”. Now, you’ll need to create two more zones, so go ahead and right-click on “Forward Lookup Zones” and click on “New Zone”.
- This will open the “New Zone Wizard”.
-
- In Zone Type, select “Primary Zone” and check on the box “Store the zone in Active Directory”.
- In AD Zone Replication Scope. Select how you want DNS data to be replicated.
- Give your DNS a zone name (netadmintools.com, for instance).
- Leave Dynamic updates by default, and click on next.
- Do the same for the second zone name, but change the naming and replication scope. For the name use an underscore sign (_) + msdcs (for example, _msdcs.netadmintools.com), and for the replication, use the option: “to all DNS servers running on domain controllers in this forest: … ”
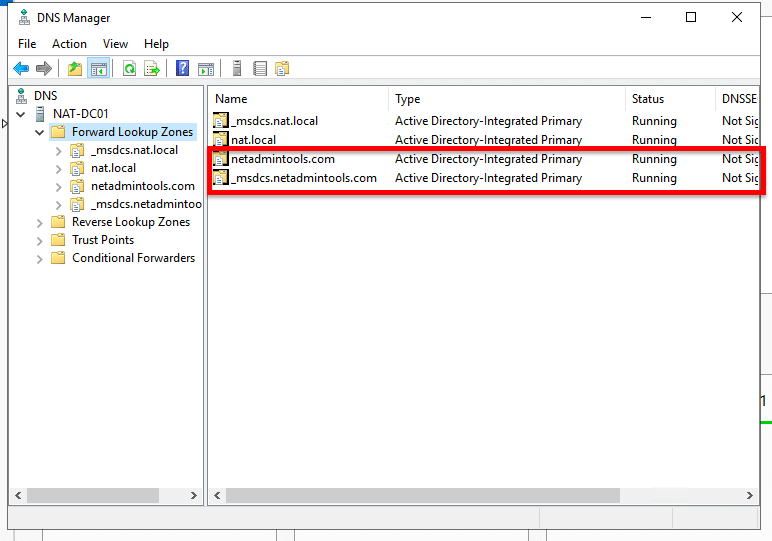
- You’ll end up with two new DNS zones.
- These two zones are doing nothing now, as each DC in the forest is still using the old zones.
- You’ll need to rename the Active Directory domain name. You can use the PowerShell command-line utility “Rendom /list” to list the naming context in the forest in XML format.
- Open the XML file and replace the DNS name for each Domain Controller in the forest. Then proceed to upload the XML file to the forest partition using “Rendom /upload”. To make the DC change, issue a “Rendom /prepare” and “Rendom /execute” and restart the server.
5. Additional Active Directory Setup
Below are two critical additional Active Directory setups.
Adding a new Domain Controller to an Existing Root Domain
- Make sure both domains have connectivity.
- Create a new domain. Go to Add Roles and Features, select role-based or feature-based installation, and select the local server. On server roles, pick the Active Directory Domain Services.
- Before closing installation, choose “promote this server to a domain controller”. In the next screen: “Deployment configuration,” select “Add a domain controller to an existing domain”. Select your domain through name or credentials.
- On additional options, select “Replicate from” and “your root domain controller”. Then, go ahead and install it.
- Change the DNS server of the new domain controller to the core DNS server.
Create a new Active Directory Users, Computers, or Groups
- Go to Server Manager > Local Server > Tools > Active Directory Users and Computers.
- Right-click on your domain name (or within any OU) > “New” > Users, Computer, or Group.
- If you are creating a new user, you’ll need to add the first and last name, the login name, and the password. If you make a new Group, give it a new name.
- To add the new user or computer to the new group, right-click on the new user, “Add to a group” > Go ahead and find and select the group.
Managing multiple AD instances
Active Directory provides the access rights management system in Windows Server for on-premises resource access but it is also built into many other systems. If you use Microsoft 365 on the cloud, you have another implementation to deal with that you can’t manage from the interface that is built into Windows Server. There are other tools that use Active Directory for user account management, such as Google Workspaces and there are AD implementations available on Azure and AWS.
Although all of these different flavors of AD are functionally the same, they are technically separate because of the different infrastructure that supports each service, you can’t merge their administration through the native consoles offered by each package. Instead, you need to set up your user accounts in one system and export it to the others – this is known as replication. With this technique, you can create a consistent list of user accounts across all of the applications and platforms that your business users need to get into to and construct a single sign-on environment.
ManageEngine AD360 – FREE TRIAL
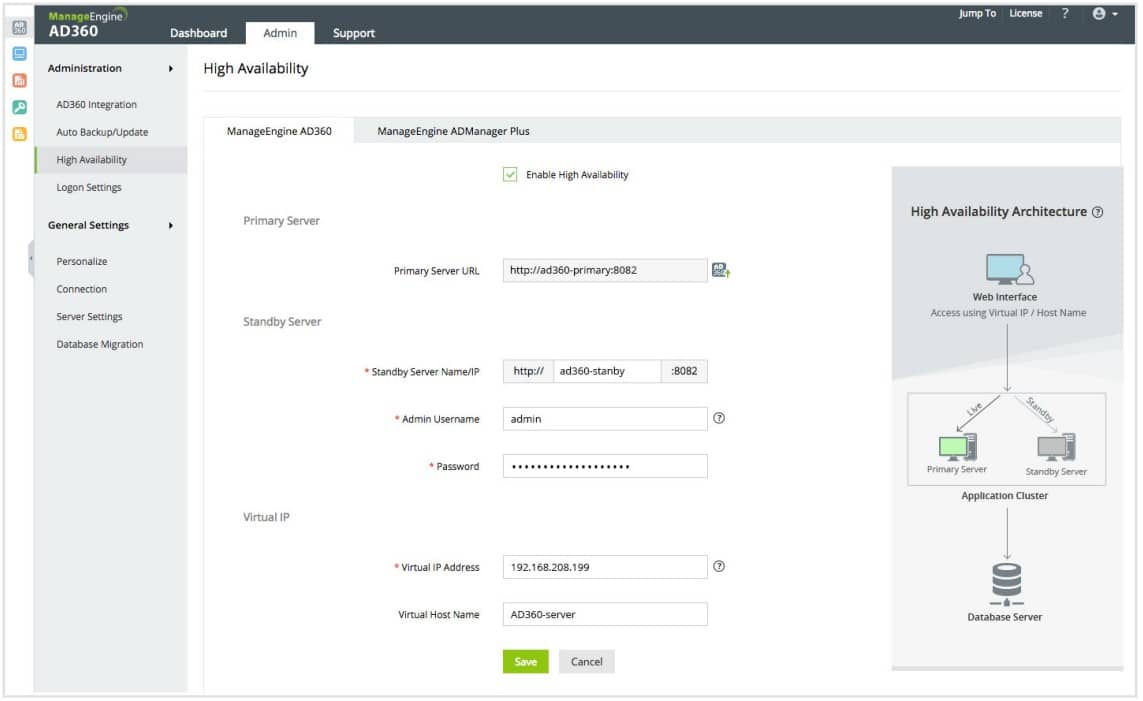
The easiest way to coordinate all of your Active Directory services is through a coordinating third-party tool, such as ManageEngine AD360. The AD360 system is a bundle of AD services and it provides a console that substitutes for the interface of Active Directory. With this system, you manage your standard Active Directory instance through AD360 and that tool ripples those values through to all of your AD instances automatically behind the scenes. The best way to understand the time-saving benefits of such as system is to access the 30-day free trial of AD360.
Features of ManageEngine AD360
ManageEngine AD360 is an integrated Active Directory (AD) management and reporting solution that helps IT administrators simplify their day-to-day tasks. It provides a comprehensive set of features to help manage, monitor, and report on the health and performance of your AD environment. Here are some of its features:
- Keeps Track of Exchange Traffic: With ManageEngine AD360, users can keep track of all aspects of Exchange traffic, including mailbox size, email traffic, OWA consumption, etc. It also allows users to export reports in different formats like PDF, HTML, CSV, and XLS.
- AD Audit and Compliance: Runs AD audits and checks whether significant changes to AD objects comply with IT regulatory compliance standards like SOX, HIPAA, PCI, etc.
- Automated Workflow: ManageEngine AD360 provides automated workflows for automating mundane tasks like creating users or resetting passwords. Further, it helps IT administrators easily create reports on user activity, monitor security events, enforce password policies, and more.
- Single sign-on Management: With AD360, you may implement a single sign-on environment and use the tool’s multi-factor authentication management features. Further, you have access to change the design of the control console. This enables you to grant Help Desk personnel and junior staff partial views so they may fulfill assigned duties without having full access to your user rights.
- Monitor Active Directory’s on-premises and cloud-based implementations: Microsoft Office and Microsoft Exchange Server email systems are all within the authority of AD360’s Active Directory coverage. With the help of remote domain controllers, it can also monitor access to cloud-based services. Further, you may add, remove, change, and suspend access rights with AD360.
Why do we recommend it?
ManageEngine AD360 offers an all-in-one solution for Active Directory management, addressing the challenges that IT administrators often face when dealing with fragmented AD environments. The ability to centrally manage both on-premises and cloud-based implementations means that organizations can maintain a consistent and secure AD environment regardless of where their resources are located. Its comprehensive reporting and auditing capabilities help organizations maintain compliance and understand their AD environment’s health and performance.
Who is it recommended for?
ManageEngine AD360 is ideal for IT administrators and organizations that use multiple AD services, both on-premises and in the cloud. It’s especially beneficial for larger organizations with complex AD environments that need to maintain consistency, security, and compliance across all their AD instances.
Pros:
- With ManageEngine AD360, you can easily set up automated reports for user accounts, computers, groups, GPOs, OUs, and more.
- You can access real-time insights into the health of your network with its advanced monitoring capabilities.
- ManageEngine AD360 offers powerful tools to help you troubleshoot problems quickly and efficiently.
- Helps streamline the Active Directory environment.
- It is a comprehensive Active Directory management solution that helps IT administrators manage and secure their Windows-based networks.
Cons:
- Lacks support for software
- ManageEngine AD360 only works in an Active Directory configuration on Windows Server

